Sample CRM app with Fauna and Appsmith
Application development with Fauna and Appsmith is easy with the Fauna GraphQL API. In this tutorial, you’ll build a sample Customer Relationship Management (CRM) app using Fauna for data storage, a front end built with Appsmith, and GraphQL for querying and data manipulation.
Prerequisites
-
A Fauna account. Sign up or log in via the Fauna Dashboard.
-
An Appsmith account.
Set up a Fauna database
-
Create a new database
-
In the Fauna Dashboard, click the CREATE DATABASE link in the upper left corner.
-
Name your database FaunaCRM (or another name of your choice).
-
In the
Region Groupdropdown menu, select Classic. -
Leave the
Use demo databox unchecked. -
Click the CREATE button.
-
-
Import a GraphQL schema for your database
-
Using your preferred text editor, create a file named
schema.gqlwith the following content:graphqlCopied!type Customer { Customer_ID: String! Customer_name: String! Customer_email: String! Customer_Stage: String! Products: String! } type Product { ProductID: String! ProductName: String! } type Query { allCustomers: [Customer!] allProducts: [Product!] } -
In the Fauna Dashboard, click GRAPHQL in the left-side navigation.
-
Click IMPORT SCHEMA, which opens your browser’s file selector. Select the
schema.gqlfile, and click the file selector’s Open button.The schema creates collections named
CustomerandProduct, as well as indexes to support querying them.
-
-
Add some documents
The new collections were created when you imported the schema, but there are no documents in them yet. Click SHELL in the left-side navigation to access the Fauna Shell, where you can run shell commands to access and manipulate your data.
Run the following command in the shell to add documents to the
Customercollection:shellCopied!Map( [ { Customer_ID: "c1001", Customer_name: "Confidence Okoghenun", Customer_email: "confidence@appsmith.com", Customer_Stage: "Opportunity", Products: "p1111, p1112, p1113, p1114, p1115" }, { Customer_ID: "c1002", Customer_name: "Courtney Simpson", Customer_email: "courtney.simpson@email.com", Customer_Stage: "Opportunity", Products: "p1114, p1113, p1112" }, { Customer_ID: "c1003", Customer_name: "Daniel Carlson", Customer_email: "daniel.carlson@email.com", Customer_Stage: "Customer", Products: "p1113, p1112, p1114, p1115" }, { Customer_ID: "c1004", Customer_name: "Paul Pruitt", Customer_email: "paul.pruitt@email.com", Customer_Stage: "Opportunity", Products: "p1115, p1112" }, { Customer_ID: "c1005", Customer_name: "Erica Dawson", Customer_email: "Erica.Dawson@email.com", Customer_Stage: "Lead", Products: "p1116, p1113, p1111" }, { Customer_ID: "c1006", Customer_name: "Alyssa Smith", Customer_email: "Alyssa.Smith@email.com", Customer_Stage: "Opportunity", Products: "p1117, p1114, p1112, p1113" }, { Customer_ID: "c1007", Customer_name: "Richard Miller", Customer_email: "Richard.Miller@email.com", Customer_Stage: "Lead", Products: "p1118, p1115, p1113" }, { Customer_ID: "c1008", Customer_name: "Emily Gonzalez", Customer_email: "Emily.Gonzalez@email.com", Customer_Stage: "Opportunity", Products: "p1119, p1116, p1114" }, { Customer_ID: "c1009", Customer_name: "Mark Hinton", Customer_email: "Mark.Hinton@email.com", Customer_Stage: "Customer", Products: "p1120, p1117, p1115" }, { Customer_ID: "c1010", Customer_name: "Jason Todd", Customer_email: "Jason.Todd@email.com", Customer_Stage: "Customer", Products: "p1121, p1118, p1111, p1116" } ], Lambda( "data", Create(Collection("Customer"), { data: Var("data") }) ) )Next, add some documents to the
Productcollection:shellCopied!Map( [ { ProductID: "p1111", ProductName: "Face Wash" }, { ProductID: "p1112", ProductName: "Hair shampoo" }, { ProductID: "p1113", ProductName: "Pet food" }, { ProductID: "p1114", ProductName: "Juice" }, { ProductID: "p1115", ProductName: "Socks" }, { ProductID: "p1116", ProductName: "Shoes" }, { ProductID: "p1117", ProductName: "Slippers" }, { ProductID: "p1118", ProductName: "Wallet" }, { ProductID: "p1119", ProductName: "Headphones" }, { ProductID: "p1120", ProductName: "Television" }, { ProductID: "p1121", ProductName: "Phone charger" }, { ProductID: "p1122", ProductName: "Battery Bank" }, { ProductID: "p1123", ProductName: "Trash Can" }, { ProductID: "p1124", ProductName: "Table" }, { ProductID: "p1125", ProductName: "Chair" }, { ProductID: "p1126", ProductName: "Speakers" }, { ProductID: "p1127", ProductName: "Laptop" } ], Lambda("data", Create(Collection("Product"), { data: Var("data") })) )
Create a custom role and an API key
The safest way to access Fauna from a remote service such as Appsmith is to create a custom role which can only access the collections you specify, and then create an API key for that role.
-
Create a new custom role
Run the following command in the shell:
shellCopied!CreateRole({ name: "CRMrole", privileges: [ { resource: Collection("Customer"), actions: { read: true, write: true } }, { resource: Collection("Product"), actions: { read: true } }, { resource: Index("allCustomers"), actions: { read: true, write: true } }, { resource: Index("allProducts"), actions: { read: true } } ] })The above command creates a role named
CRMrolewithreadandwritepermissions on theCustomercollection and theallCustomersindex, andreadpermission on theProductcollection and theallProductsindex. -
Create an API key
Next, run the following command in the shell:
shellCopied!CreateKey({ role: Role("CRMrole") })Copy the string contained in the
secretfield and store it carefully. If you lose it, you must create a new key. There’s no way to display the secret for a key after it’s been created.
Create a new data source in Appsmith
Now that your database backend is set up, you’re ready to connect it with Appsmith.
-
Log in to the Appsmith console
Navigate to https://app.appsmith.com/user/login and log in with your Appsmith credentials.
-
Create a new app
On the APPS tab, click the NEW button to create a new app. Rename it to
Fauna CRMin the upper left corner. -
Add a data source
-
Click DATASOURCES in the left-side navigation.
-
Click AUTHENTICATED API from the list of data sources.
-
Rename the new data source
FaunaCRM_data. -
In the URL text box, enter
https://graphql.fauna.com/graphql. -
In the HEADERS text boxes, enter
Authorizationin the left box andBearer <your-api-secret>in the right box. Replace<your-api-secret>with the Fauna API secret key you created earlier. -
Leave the other fields unchanged and click SAVE.
The new data source is now ready to use.
-
Create queries
Next, create some GraphQL queries for the new data source to use in querying your Fauna database.
-
Create a new API
-
In the Appsmith console, click the NEW API button to the right of your new data source.
-
Rename the new API to
CustomerAPI. -
Select
POSTfrom the dropdown menu of HTTP methods. -
Click the BODY tab immediately below the URL.
-
Enter the following query in the text box:
shellCopied!{ query: ' query { allCustomers { data { _id Customer_ID Customer_name Customer_email Customer_Stage Products } } }' }You can test your query by clicking the RUN button in the upper right corner. If the query is successful, the contents of your
Customercollection appear in the pane below the query. If the query fails, you can find error information under the ERRORS tab.Now, you need another query to get data from the
Productcollection. -
In the left-side navigation, click on QUERIES/JS to expand the selection.
You should see your existing query
CustomerAPIthere. -
Click ADD QUERY/JS.
-
In the modal window, click New FaunaCRM_data Query.
-
Rename the new API to
ProductAPI. -
Select
POSTfrom the dropdown menu of HTTP methods. -
Click the BODY tab immediately below the URL.
-
Enter the following query in the text box:
shellCopied!{ query: ' query { allProducts { data { _id ProductID ProductName } } }' }Again, you can test your query with the RUN button. You should see the contents of your
Productcollection in the results pane.Next, create a query to update a customer’s information. This one is a bit more complex and it involves some UI elements which don’t exist yet, so you can’t test it right away, but it will be useful after you create the app UI.
Repeat the above steps to create a new API. Name the new API
updateCustomerAPIand give it the following query:shellCopied!{ query: ' mutation ($id: ID!, $object: CustomerInput!) { updateCustomer(id: $id, data: $object) {_id } }', variables: { "object": { "Customer_ID": {{Table1.selectedRow.Customer_ID}}, "Customer_name": {{Input1.text}}, "Customer_email": {{Input2.text}}, "Customer_Stage": {{Select1.selectedOptionValue}}, "Products": {{MultiSelect1.selectedOptionValues.join()}} }, id: {{Table1.selectedRow._id}} } }You may see some error messages in the Appsmith console, but don’t worry. The query will work after you’ve created the necessary UI elements for your app.
-
Build a user interface
The next step is to create a UI for your app with Appsmith.
-
Start with a blank canvas
Click the Page1 link in the upper left corner of the Appsmith console.
-
Add UI elements
-
Select the WIDGETS tab at the top of the left-side navigation.
-
Find the
Tablewidget and drag it onto the canvas. Expand the table to fill most of the canvas. -
In the right-side panel, delete the placeholder code in the TABLE DATA box and replace it with the following line:
shellCopied!{{CustomerAPI.data.data.allCustomers.data}}The table should now be populated with data from your
Customercollection. -
Turn off the visibility for some unnecessary columns.
In the right-side panel, locate the COLUMNS pane and click the eye icon for the
_idcolumn and theProductscolumn. -
Drag a
Modalwidget onto your canvas. -
Rename the widget to
detailsModal. Close the modal window with theXicon in the upper right corner. -
Mouse over the table widget and click the
Table1link to open its properties. -
Click the ADD A NEW COLUMN button in the right-side panel.
-
Rename the column
Details. -
Click the gear icon on the
Detailscolumn to see its properties. Change the column type fromPlain TexttoButton. -
Change the button’s label from
ActiontoView. -
Select
Open modalfrom theonClickdropdown menu. -
Select
detailsModalfrom theSelect Modaldropdown menu. -
Click a VIEW button to open the modal window.
-
Drag four
Textwidgets onto the modal, stacking them vertically. Relabel themName,Email,Stage, andProducts.At this point the modal window should look similar to this:
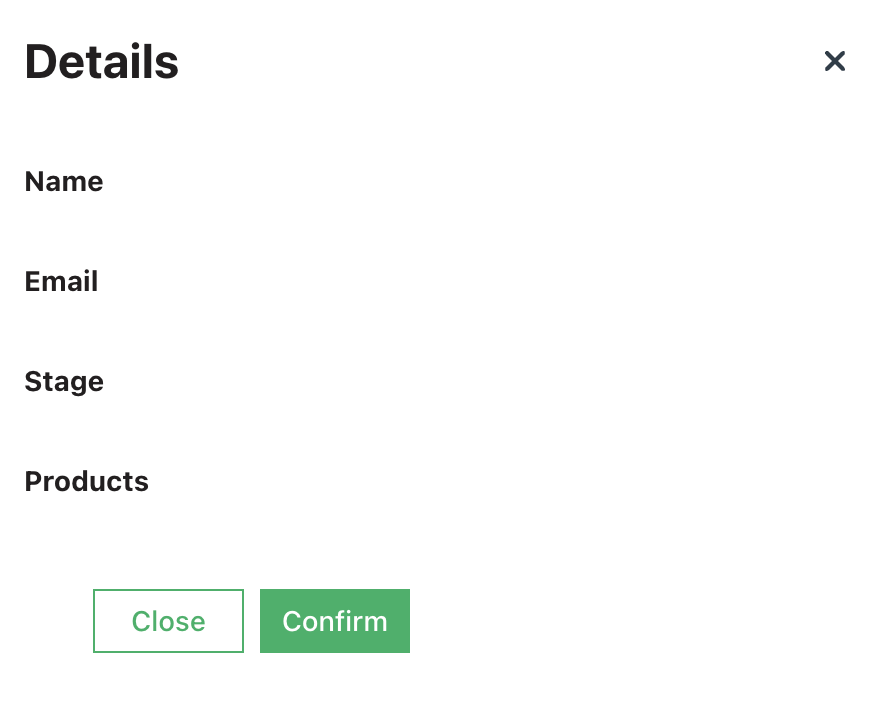
-
Drag
Inputwidgets next to theNameandEmailtext boxes. Set the default text for the input box next theNamefield to the following line:shellCopied!{{Table1.selectedRow.Customer_name}}Set the default text for the input box next the
Emailfield to the following line:shellCopied!{{Table1.selectedRow.Customer_email}} -
Drag a
Selectwidget next to theStagetext box. Replace the code in itsOptionspanel with the following code:shellCopied![ { "label": "Customer", "value": "Customer" }, { "label": "Opportunity", "value": "Opportunity" }, { "label": "Lead", "value": "Lead" } ]Set the default value for the
Selectwidget to the following line:shellCopied!{{Table1.selectedRow.Customer_Stage}} -
Drag a
Multiselectwidget next theProductstext box. Set itsOptionspanel to the following:shellCopied!{{ProductAPI.data.data.allProducts.data.map( (obj) =>{ return {'label': obj.ProductName, 'value': obj.ProductID} })}}Set its default value to the following:
shellCopied!{{Table1.selectedRow.Products}}The
Detailswindow should now look similar to the following:
-
Edit the properties for the CONFIRM button. In the
Eventssection of the properties panel, click the JS button in theonClickproperty. Enter the following code:shellCopied!{{updateCustomerAPI.run(() => {CustomerAPI.run(), closeModal('detailsModal')}, () => {})}}This sets an
onClickevent for the button which refreshes the table and closes the window.
-
Test the app
Your app is now complete and ready to try out. Click the DEPLOY button in the top-right corner of the console to view the app in a web page. You can view and update customer details with the modal window.
Is this article helpful?
Tell Fauna how the article can be improved:
Visit Fauna's forums
or email docs@fauna.com
Thank you for your feedback!