Use Retool and Fauna to build a Todo app
Application development with Fauna and Retool is easy with the Fauna GraphQL API. In this tutorial, you’ll build a Todo app using Fauna for data storage, a front end built with Retool, and GraphQL for querying and data manipulation.
Prerequisites
-
A Fauna account. Sign up or log in via the Fauna Dashboard.
Set up a Fauna database
-
Create a new database
-
In the Fauna Dashboard, click the CREATE DATABASE link in the upper left corner.
-
Name your database fauna-todo-db (or another name of your choice).
-
In the
Region Groupdropdown menu, select Classic. -
Leave the
Use demo databox unchecked. -
Click the CREATE button.
-
-
Import a GraphQL schema for your database
-
Using your preferred text editor, create a file named
schema.gqlwith the following content:graphqlCopied!type Todo { title: String! completed: Boolean! list: List } type List { title: String! todos: [Todo] @relation } type Query { allTodos: [Todo!] todosByCompletedFlag(completed: Boolean!): [Todo!] allLists: [List!] } -
In the Fauna Dashboard, click GRAPHQL in the left-side navigation.
-
Click IMPORT SCHEMA, which opens your browser’s file selector. Select the
schema.gqlfile, and click the file selector’s Open button.
-
-
Add some documents
You can take a look at the results of the schema import by clicking DB OVERVIEW in the left-side navigation. You have two collections named
TodoandList, but neither collection has any documents in it yet. TheTodocollection is for individual todo items, and theListcollection is for categories of todo items. We can add a newListdocument and several associatedTododocuments with one GraphQL mutation:graphqlCopied!mutation CreateListWithTodos { createList(data: { title: "Chores", todos: { create: [ {completed: false, title: "Walk the dog"}, {completed: false, title: "Feed the cat"}, {completed: false, title: "Buy milk"} ] }, }) { _id title todos { data { title } } } }Paste the above mutation into your GraphQL Playground panel and click the "Play" button. Now if you go back and look at your collections again, you should see the results.
For more information about using relations in a GraphQL schema, see the Relations tutorial. Before leaving the GraphQL Playground let’s run one more mutation, so there is more than one item in the List collection.
graphqlCopied!mutation CreateListWithTodos { createList(data: { title: "Exercise Goals", todos: { create: [ {completed: false, title: "Run 5 miles"}, {completed: false, title: "Swim for 30 minutes"}, {completed: false, title: "Bike to Fresno and back"} ] }, }) { _id title todos { data { title } } } } -
Create an access key
-
Click SECURITY in the left-side navigation.
-
Click the NEW KEY button.
-
Leave all the form inputs as they are and click the SAVE button.
-
Your key’s secret is displayed. Copy it and save it for later use. Secrets are only ever displayed once. If you lose a secret, you have to create a new key.
-
Create a Retool application
Your Fauna database setup is complete, and now you’re ready to create a user interface for your Todo app. The Retool platform allows you to construct user interface elements which trigger GraphQL queries to your Fauna database, so you can add Todo items and mark them completed.
-
Create a new Retool resource
-
Log in to your Retool account. If you’re already logged in, navigate to your account home page by clicking the Retool icon in the upper left corner.
-
On your Retool account home page, select RESOURCES from the top navigation.
-
Click the CREATE NEW button.
-
On the resource creation page, click the GRAPHQL button in the APIS section.
-
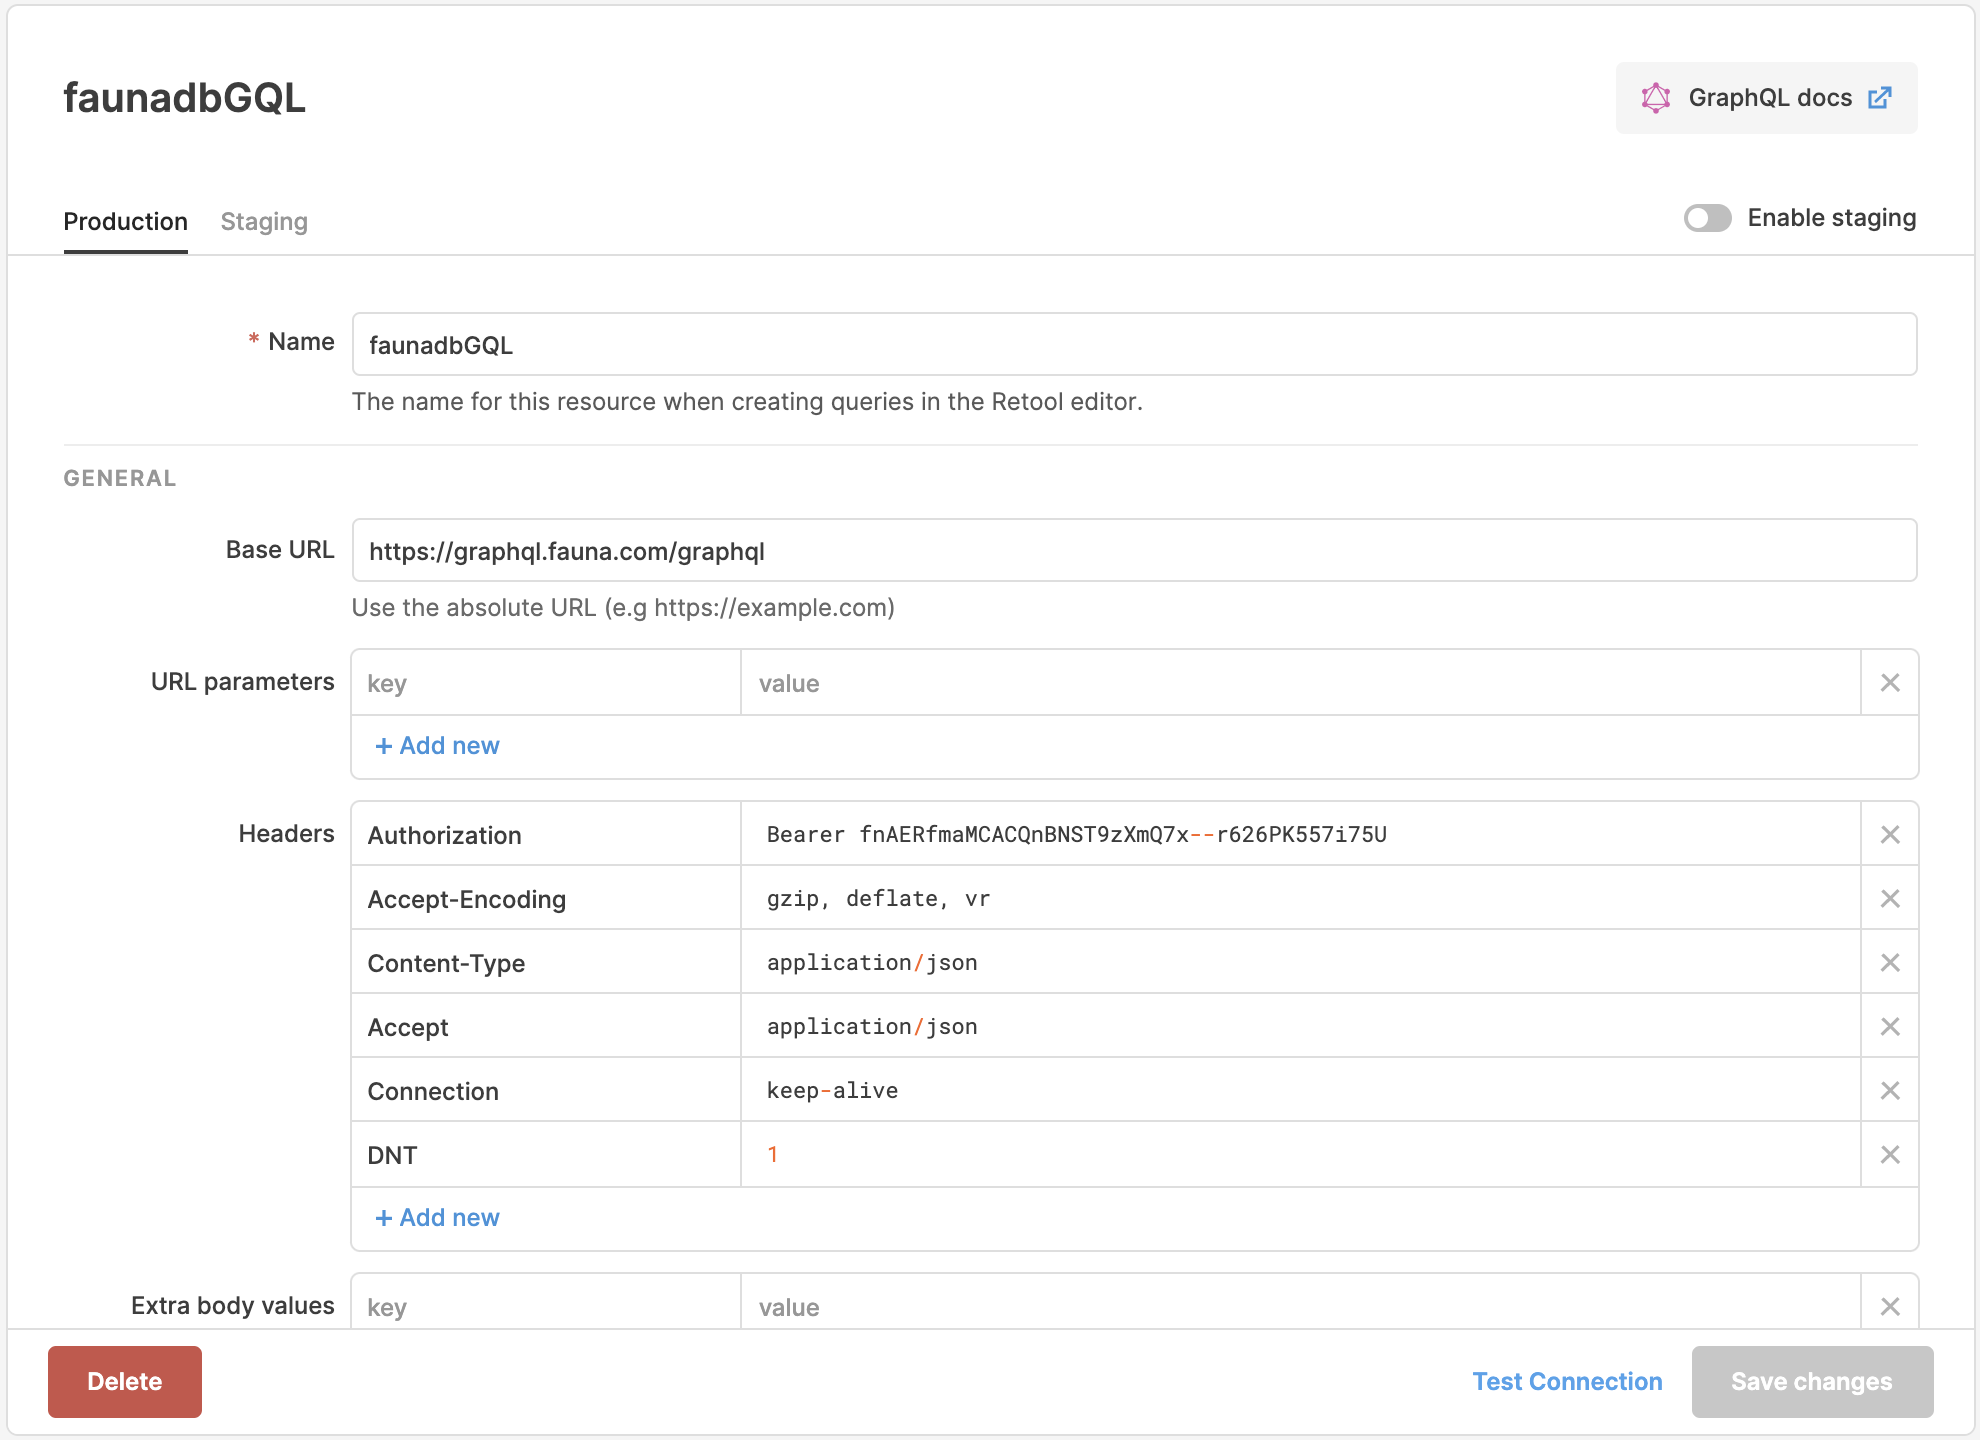
Name the resource faunadbGQL (or another name of your choice).
-
For the Base URL, enter https://graphql.fauna.com/graphql
-
Leave the URL Parameters section blank.
-
In the Headers section, enter the following keys and values:
Key Value Notes AuthorizationBearer <key secret for your database>
Include your key secret here.
Accept-Encodinggzip, deflate, br
Specifies which compression algorithms the client can use.
Content-Typeapplication/json
Specifies the media type of the resource.
Acceptapplication/json
Specifies which media types the client can use.
Connectionkeep-alive
Specifies a persistent network connection.
-
Leave the other fields unchanged.
-
Click TEST CONNECTION to validate your form entries. If the connection is successful, click CREATE RESOURCE, then CREATE AN APP.
-
Name your app fauna-todo-app (or another name of your choice).
-
-
Add a list table showing all items
You should now see the main Retool app development workspace, where you can assemble the components for your Todo app.
-
There may be a default table in your main app workspace named
table1. To delete it, select the table and then select Delete from the action menu on the right side of the panel (next to the nametable1). -
The bottom left section of your Retool workspace is where you can create and edit resource queries. Click the NEW dropdown menu and select Resource query.
-
From the RESOURCE dropdown menu, select faunadbGQL (or the name of the resource you created earlier).
-
In the Query box, add the following GraphQL query:
graphqlCopied!query FindAllTodos { allTodos { data { _id title completed list { title } } } }The above query returns all the items in your
Todocollection. -
Click the SAVE (sometimes Save and Run) button.
-
Rename your new resource query
allTodos. -
The right-side panel of your Retool workspace shows commonly used UI components. Drag a table into your main canvas. It is named
table1by default, and you can leave that name as it is.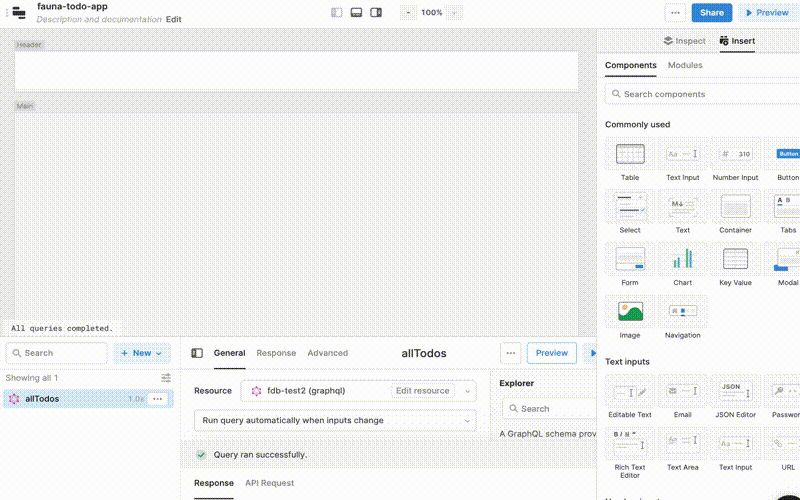
-
When the table is selected, the right-side panel shows its properties. Enter the following query reference in the
Datainput box:{{allTodos.data.allTodos}}All the Todo items currently in your collection should appear in the table, all in one big column. We’ll separate out the columns in the next step.
-
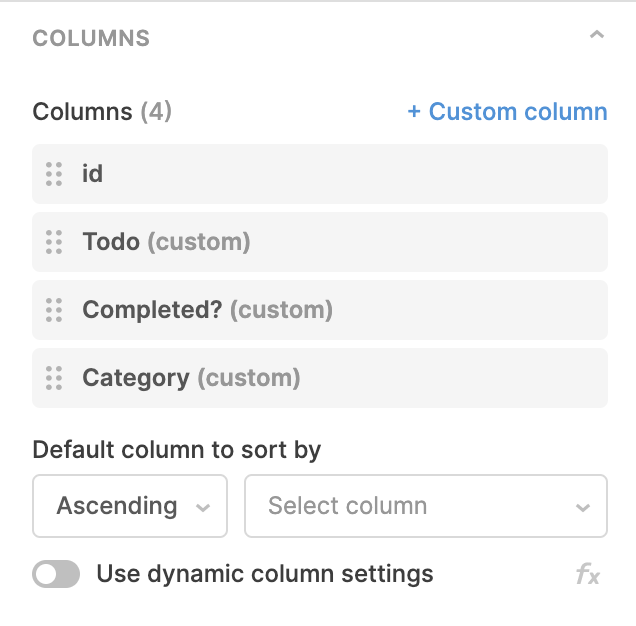
With the table selected, look in the right-side panel for the
Columnssection. Click the CUSTOM COLUMN link three times, to give you a total of four columns. -
You can edit your new columns by clicking them to bring up their properties modal window. Edit the four columns to have the following properties:
Column title Mapper/Calculation id
{{currentRow.data._id}}Todo
{{currentRow.data.title}}Completed?
{{currentRow.data.completed}}Category
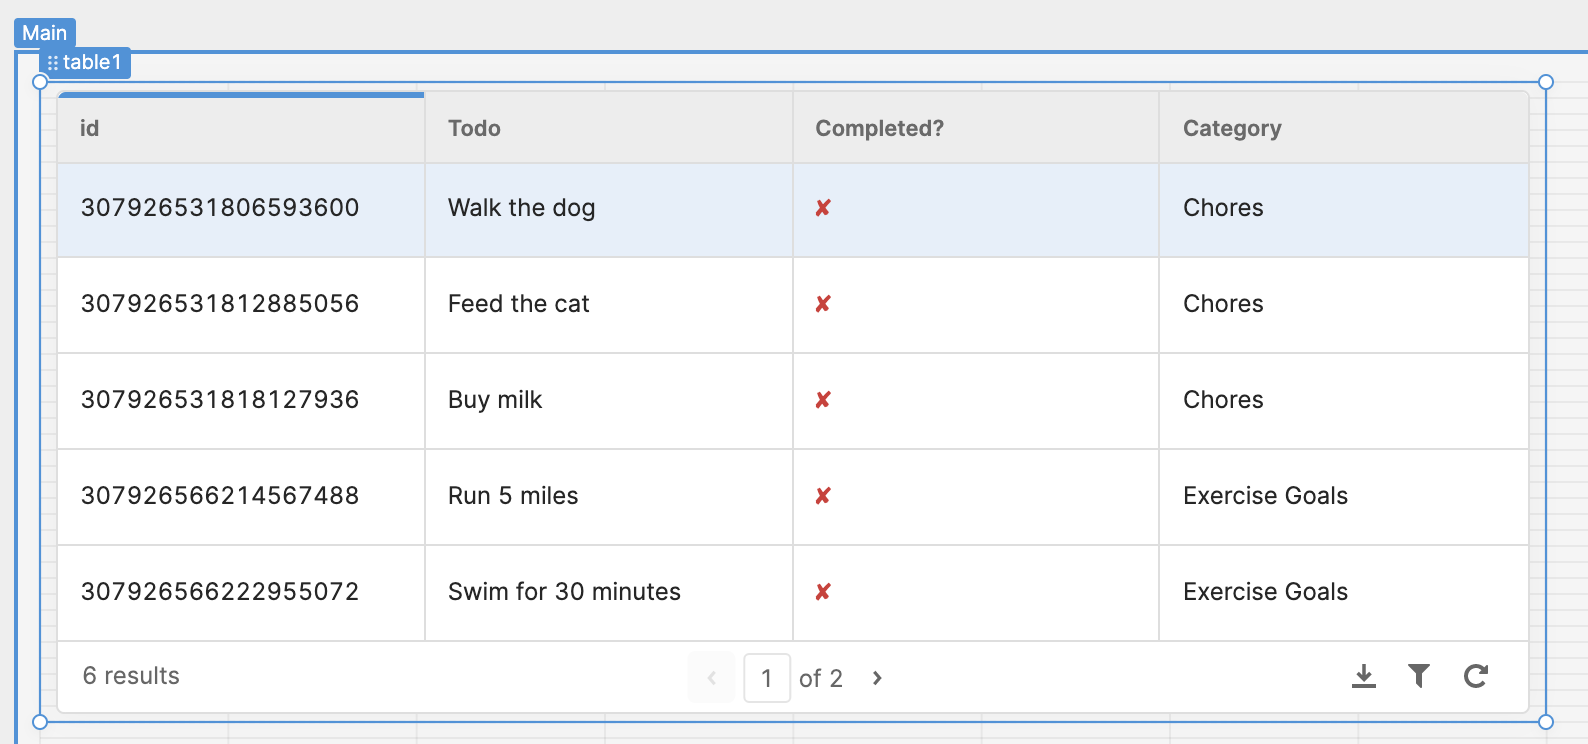
{{currentRow.data.list.title}}Once your columns are defined you should see four columns in your table, listing your Todo items along with their ID, their category, and whether they’re completed or not.
Your table should now look something like this:
-
-
Create a button for adding new Todo items
Next, add a button which opens a modal window with a form for adding new Todo items. The form uses a GraphQL query to populate the list of categories, and then another query to add a document to your
Todocollection.-
Click the INSERT link in the upper right corner to display the
Componentspanel on the right side. Locate the UI elementModaland drag it to your canvas, above the table.In Retool, modal windows are attached to buttons by default, so you don’t need to add a separate button. -
With the modal’s button selected, use the
Button textinput box on the right side to rename the button toNew Todo item. -
Clicking the new button brings up a canvas onto which you can add UI elements to the modal window. Drag a
Formcomponent onto the canvas.You can always bring back the components menu by clicking INSERT in the top right corner. -
Drag a
Text inputcomponent onto the form canvas. Update itsLabelproperty to readNew item.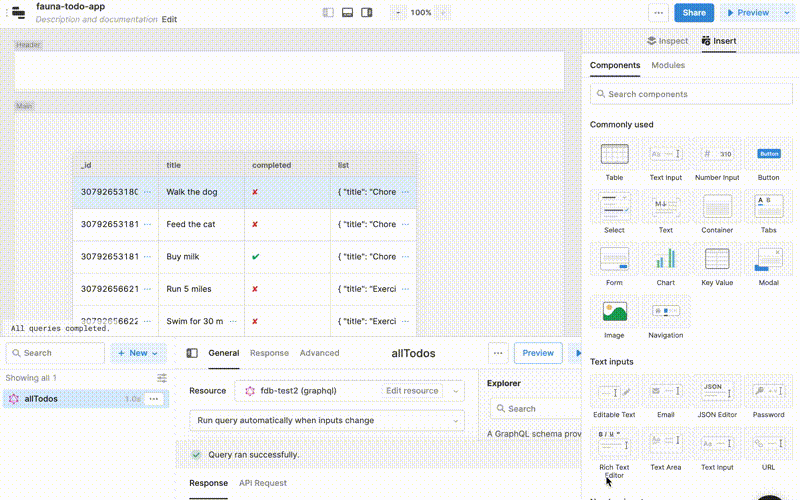
-
Drag a
Selectcomponent onto the form canvas below the text input.This select box will show a list of Todo item categories, so it needs a resource query.
-
Down in the lower left corner, click the NEW dropdown menu and select
Resource query. -
In the
Querybox, enter the following GraphQL query:graphqlCopied!query lists { allLists { data { _id title } } } -
Click SAVE and rename the new query
listsDropdown. -
Edit the
select1form element to have the following properties:-
Label: Category
-
Values:
{{listsDropdown.data.allLists.data.map(val=>{return val._id})}} -
Display values:
{{listsDropdown.data.allLists.data.map(val=>{return val.title})}}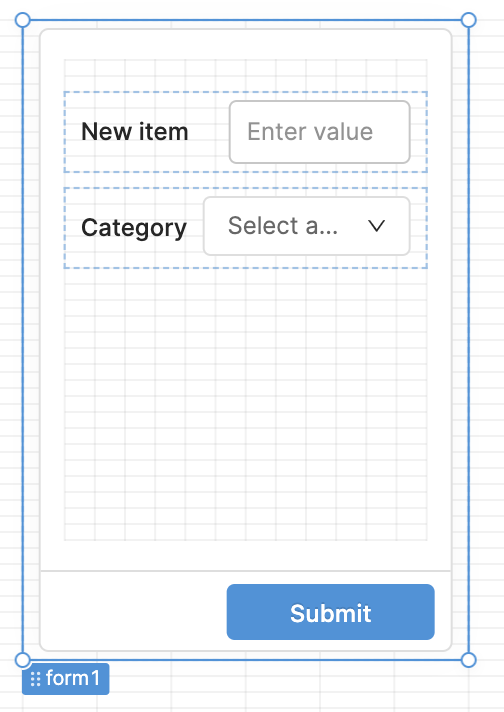
-
-
Now we need a query for the form’s
Submitbutton to add a document to yourTodocollection. Create a new resource query with the following GraphQL query:graphqlCopied!mutation CreateAListedTodo { createTodo(data: { title: "{{textInput1.value}}" completed: false list: { connect: "{{select1.value}}" } }) { title completed list { title } } } -
After this query runs, the list of items should refresh, so it needs an event handler. Below the query box, click the
Newlink in the Event handlers section and add a new event handler with the following properties:-
Event: Success
-
Action: Trigger query
-
Query:
allTodos
-
-
Save the new resource query and rename it
createTodo. -
Now you can attach the new resource query to your form. Select the form and locate its event handlers on the right side. Add a new event handler and select
createTodofrom theQuerydropdown menu. -
The button now works, but you need another event handler to make the modal window close after the form submits. Add a new event handler with the following properties:
-
Event: Submit
-
Action: Control component
-
Component:
modal1 -
Method: Close
-
-
You can drag and drop the form elements to reposition and reshape them, and then close the form canvas. Your NEW TODO button should now work, and you can try it out.
-
-
Create a button to mark Todo items completed
Next, you’ll add a button to mark individual Todo items as completed. First, create a new resource query to update a Todo item, then add a button to the main canvas.
-
Create a new resource query with the following GraphQL mutation:
graphqlCopied!mutation completeTodo { updateTodo(id: "{{table1.selectedRow.data.data._id}}", data: { title: "{{table1.selectedRow.data.data.title}}" completed: true } ){ title completed list { title } } } -
Add an event handler to the new resource query with the following properties:
-
Event: Success
-
Action: Trigger query
-
Query:
allTodos
-
-
Save the new resource query and rename it to
completeTodo. -
Back in your main canvas, drag a Button component next to the
New Todobutton. -
Edit the new button’s
Textproperty to readMark Completed. -
Add an event handler to the new button with the following properties:
-
Event: Click
-
Action: Trigger query
-
Query:
completeTodo
-
-
Set the button’s
Disabledproperty to{{table1.selectedRow.data.data.completed}}so that it is grayed out when a completed item is selected.
-
At this point the app is functional, and you can click the PREVIEW button in the upper right corner to see how it looks in a web page. If you feel like you’ve grasped the basics you can stop here, or if you’d like to add more functionality to your app you can keep going.
Add more functionality
The Todo app works, but there’s one more feature we can add. In the following section you’ll add a switch to show only uncompleted items.
-
Add an openTodos query
Create a new resource query with the following GraphQL query:
graphqlCopied!query openTodos { todosByCompletedFlag(completed: false) { data { _id title completed list { title } } } }Save the resource query and rename it
openTodos. -
Add a switch to display only open items
-
Drag a Switch component onto the main canvas. You can use the search box at the top of the Components panel to quickly locate a particular component. Rename switch to
Display open onlywith theLabelproperty. -
Add an event handler to the switch with the following properties:
-
Event: True
-
Action: Trigger query
-
Query:
openTodos
-
-
Add another event handler to the switch with the following properties:
-
Event: False
-
Action: Trigger query
-
Query:
allTodos
-
-
Update the
table1DatafieldTo make the switch work, we need to make the main list table a bit smarter. Select the
table1component and update itsDataproperty to the following:{{switch1.value ? openTodos.data.todosByCompletedFlag : allTodos.data.allTodos}} -
Update event handlers
We need to update the event handlers for the
createTodoandcompleteTodoresource queries. For each query replace the existing event handler with two new ones:Event handler 1:
-
Event: Success
-
Action: Trigger query
-
Query:
allTodos -
Only run when:
{{!switch1.value}}Event handler 2:
-
Event: Success
-
Action: Trigger query
-
Query:
openTodos -
Only run when:
{{switch1.value}}Save each resource query before closing.
-
The
Display open onlyswitch is now functional. -
Is this article helpful?
Tell Fauna how the article can be improved:
Visit Fauna's forums
or email docs@fauna.com
Thank you for your feedback!